10-16-2008
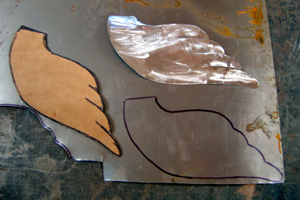
I needed to create some sort of general shape that would define and differentiate the wing area from the remainder of the body. Starting with a couple of Crane photos, I sketched my redition onto a piece of cardboard and then transferred the cardboard shape to the sheet metal. Once I was pleased with the pattern, I began to carefully cut it out with the tin snips.
You can see I have provided a means of attachment (at the middle part of the upper back) and am test-fitting the pattern here. I am looking for a nice "flow" and sense of symmetry and balance. The front edge of the wing will need to tuck closely into the body, while following the existing curvature. I think I will need to clamp the wing to the body, drill some small holes in the wing and "rosset" weld the shape in order to obtain the close proximity of the leading edge of the wing (when viewing from the front) to the body that I hope to accomplish. I will be adding two or three layers of long, wing-tip feathers and then more small feathers as I approach the leading edge, while blending addtional small feathers up and over the attachment point.

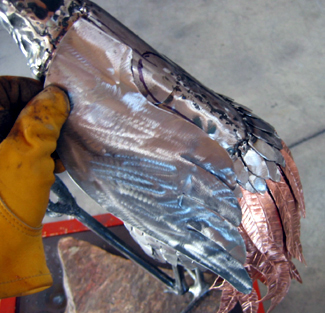
In this photo, you can see that I have tacked both wing forms into place and again, am checking for symmetry. You may also notice that I have brought additional feathers up the back
of the Crane and they are even under the wing forms - never to be seen again (but I will know that they are there...).
Addtionally; all of the copper tail feathers are now permanently in place! Once I established the look I was trying to achieve, I had to carefully remove them, one-by-one, while numbering the feather and the corresponding position on the Crane's body.
Some of you folks reading this whom are well-versed in metal work, may be wondering how I accomplished this - without discoloring the copper!?! Well, I could reveal the method, but suffice to say, I would have to... well you know the rest...